A 'Minimalist' Small Entry-Level GPS Receiver
Reviewed by Jack Yeazel
(1 April 2003)
 ..
.. ..
..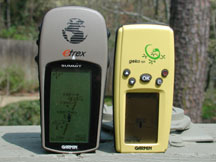
Palm-Sized Receiver.....................geko
Optional Mount....................Comparison to Summit
....
Palm-Sized Receiver.....................geko
Optional Mount....................Comparison to Summit
General:
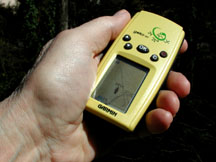
The yellow Garmin geko 101, about $100 (check prices HERE),
does not have a version number -nor can it be upgraded.
There is also a (green) geko 201 for about $125. The geko is smaller and lighter than an eTrex -using two AAA batteries instead of two AA batteries. The 201 has WAAS and a data-transfer jack. It also has more trackpoints, routes, and waypoint capacity. See (HERE) for a review of the geko 201.
So, What's Missing?
Apparently no data can be up/downloaded to the unit, since there is
no data jack. Also there is no WAAS, Route, or Map capability. However,
most of the general GPS features are available -as you can read below.
Controls:
The geko has five buttons, On/Off, Page,
Up,
Down, and "OK" (enter). All are easy
to use with one hand.
Main Pages:
All of the information needed to operate the Geko 101 is found on four
main pages (or display screens). These pages are the Satellite,
Map, Navigation, and Menu.
Pressing the PAGE button to switches between pages.
1) Satellite Page:
The Satellite Page shows you (in animation), the satellites, satellite
signal strength, and the gekos estimated location accuracy.
2) Map Page:
The Map Page shows where you are (the animated figure and provides
a picture of where you are going. As you travel, the animated figure walks)
and leaves a trail (tracklog). Waypoint names and symbols are also shown
on the map. To help you better visualize the real world, Geko 101 automatically
rotates the map as you move, so that waypoints that are ahead of you are
always displayed in front of the animated figure. The Heading indicator
shows the direction you are heading. To see the entire trip, you
can change the map scale (from 80 feet to 800 miles) by pressing and holding
the UP and DOWN buttons.
Map Page Options:
These Options allow you to use the Map Page for customizing the Map
Page. The following options are available: Map Setup: Allows you
to adjust the map settings including: Orient Map (Ahead or Northward):
When AHEAD is selected, the top of the map is oriented in the direction
you are currently moving. When NORTHWARD is selected, the map is always
oriented to the North.
3) Navigation Page:
The Navigation Page helps guiding to a destination. When moving with
no particular destination in mind, the Navigation Page shows your moving
direction and speed. When moving towards a specific destination. the Navigation
Page shows the name of the location, the distance and time to go, and displays
a direction arrow in the compass ring. To navigate, simply follow the arrow.
Navigation Page Options:
Stop Navigation: stops any active navigation (displays only when
navigating).
Reset Max Speed: this resets the Maximum Speed achieved during a
trip.
Reset Trip: the trip time, trip distance (odometer and average speed
are reset to zeros
By pressing the UP or DOWN button, you can cycle through the
Data fields at the bottom of the Navigation Page:
Average Speedthe average speed traveled since last trip reset.
Elevationthe measurement of height above mean sea level.
Headingthe direction you are traveling.
Locationshows your current latitude and longitude.
Max Speedthe maximum speed traveled since last reset.
Speedhow fast you are going.
Time/Datethe current settings.
Trip Odometerlike the odometer in your car, TRIP ODOMETER tells
you how far you've gone.
Trip Timethe total time you have traveled since the last trip reset.
4) Menu Page:
The Menu Page gives access to the Geko 101s essential features. With
the Menu Page you can create (Mark) and select Waypoints,
change the Time settings, adjust Units of measure,
and access the System setup features.
MARK Page:
The MARK Page allows you to define a location as a waypoint and then
change the waypoint symbol, name, elevation and location (latitude and
longitude). Entering a known location, then saving it as a Waypoint, works
well for geocaching.
WAYPOINTS Page:
The Waypoints Page organizes all of your waypoints in alphabetical
order or by proximity or, allows one to delete all waypoints.
GOTO will guide you from your current location to the waypoint selected while Mark creates a new waypoint for later use. Zoom adjusts the level of map detail viewable.
To start a GOTO:
1. On the REVIEW WAYPOINT Page, press the UP or DOWN button to highlight
GOTO.
2. Press the OK button to activate the GOTO with the selected waypoint
as the destination.
Using the Project waypoint feature, the Geko 101 can create a waypoint at a specified distance and bearing using an existing waypoint as a reference. You can also change the waypoint name, symbol and elevation on this page.
SYSTEM Page:
The System Page allows you to choose from three modes of operation
(Normal, Battery-Save, and DEMO), change the display back light timeout
setting, and adjust the display contrast.
GPS Mode:
The GPS receiver is always ON when it's in NORMAL mode. The normal
mode is more responsive to sudden turns or change of speed or acceleration.
When the Geko 101 is in BATTERY SAVE mode, the GPS receiver turns on and
off alternatively to conserve power.
The DEMO mode is designed for dealers to show the features and functions of the Geko 101 to potential customers inside a closed building where satellite reception is not possible. There is no navigation possible in DEMO mode. If you select the DEMO mode, a window display-s at the bottom of the screen asking you to verify that you want to turn the GPS off (the unit will stop tracking satellites, but not power off). One selects the DEFAULTS field and presses the OK button to return the UNITS page to the factory settings.
UP/DOWN button functions:
Highlight options on pages and menus
Adjust display contrast on Satellite Page
Zoom out (UP) and in (DOWN) on Map Page
Cycle through data fields on Navigation Page The OK button:
Confirms data entry or menu selections
Press and hold to activate Mark Waypoint Page
POWER button:
Press and hold to turn unit on and off
Press and release to turn display backlight on and off button or
the most recent action an a pane
Backlighting and Contrast:
If the lighting conditions make it hard to see the screen, you can
adjust the contrast or turn on the backlight. Press and release the POWER
button from any screen to turn on the backlight. The backlight is timed
to stay on for 30 seconds (for a longer time choose System on the Menu
Page) to save battery power. To adjust the screen contrast, press the PAGE
button until you see the Satellite Page. Press the UP button to make the
screen darker, press the DOWN button to make the screen lighter.
Auto Zoom (On or Off): When AUTO ZOOM is turned on, the map automatically adjusts its scale to display your entire navigating route until you manually change the zoom level. When its turned off, you must press the UP or DOWN button to select the appropriate map scale.
Waypoints (Show or Hide): Allows viewing the map with or without waypoints.
The following options are not shown if you do not have a track log:
Pan Track Log: PAN TRACK LOG allows you to move the pointer to
any point along the track and then start a TRACBACK, a GOTO, MARK a Waypoint,
or ZOOM In or Out.
Clear Track Log: The CLEAR TRACK LOG clears the track log which
is created automatically.
The following option is not shown if you are not actively navigating:
Stop Navigation: STOP NAVIGATION stops any active navigation navigation
means there is a destination waypoint.
Using the Track Log:
The Geko 101 draws an electronic breadcrumb trail or track log on
the Map Page as you travel. The track log starts recording as soon as the
Geko 101 gets a location fix. To make use of the track log, select
the PAN TRACK LOG option to show a pointer which moves along the track
log when you press the UP or DOWN button. Press the OK button to see the
four choices TRACBACK, GOTO, MARK and ZOOM.
TracBack will guide you to where you started by following the track log that you left behind, allowing you to return along a traveled path without marking any waypoints. For the best results, clear the track log before you start traveling because when the track log is full, the new track points will overwrite the oldest track points.
North Reference:
Reference refers to the orientation of a map's grid. Map makers try
to align the vertical lines on a map with True North. True North is the
direction from any location on the earth's surface to the north pole.
Maps are typically referenced to true north. Because a compass points to
magnetic north, not true north, maps indicate the difference between true
and magnetic north with a measurement called declination. The amount of
declination changes as you move around the earth. Magnetic North is the
direction in which a compass needle points.
The Geko 101 bearings will correspond to the compass if the Geko 101 is set to magnetic north. Due to errors introduced when map makers flatten the earths sphere onto paper, not all of the grid lines drawn on the map point exactly to the north pole, so the north indicated by the grid lines is called Grid North. The difference, however, is usually small enough that Grid north can be considered the same as True North for traveling on land if necessary. manually correct for the difference between Grid North and True North.
Well.. What do we think about it?
Ans: It is the smallest GPS with the smallest screen we have
seen. The unit has most standard GPS features, no maps,
no WAAS, no upgradability, no download capability for waypoints,
routes, and tracks. It is not a bad GPS. But we do think for
any serious use, buying a slightly more expensive unit with maps and computer
interface capability will be worthwhile. Units without maps tend
to be less useful than units with maps.. Even rudimentary maps.
Recommendation?
Check out the geko 201 for 25 bucks more or a LEGEND or similar with
maps, larger screen and more flexibility.